2D Patterns & Card Models
New! A very simple (one, two, three) plate layout example!
Attention awning and canopy makers, tent makers, marine canvas makers, sheet metal workers, card and paper modelers, scale model makers, clothing designers - in fact anyone interested in unwrapping and laying out 2D patterns from any 3D shape. Pilot3D lets you easily create custom 3D shapes and unwrap them into 2D shapes to create full-size patterns or pattern files that can go directly to CNC fabric cutting machines.
Take on that custom job with unique shapes and know that you can create the patterns quickly and easily!
The following is an example of a custom awning design with intersecting surfaces and curved ends.
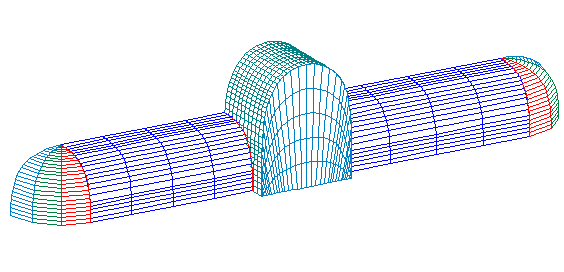
Note how Pilot3D can find the intersection between surfaces, trim off the overlap and then unwrap the surfaces into accurate 2D patterns, as shown below.
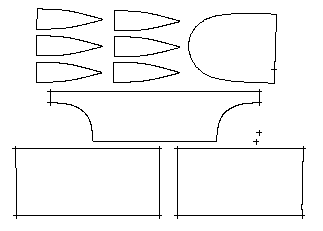
These patterns are ready for full-size plotting or CNC cutting.
Pilot3D can even give you the pattern shapes for all of the support structure and the amount of material that is needed.
Card and Paper Modelers
Pilot3D can give you 2D patterns for any of your curved surface shapes. All you have to do is to define the edge curves for the 3D shape. Pilot3D will tell you if you can unwrap it to a flat 2D pattern. If not, you can change the shapes of the curves and Pilot3D will give you instant feedback on the developability of the surface. No other program at any price can do this for you. Pilot3D also allows you to break a surface down into smaller sections that can more accurately be unwrapped to a 2D pattern.
For additional information see our page on Surface Development and Layout. The following example gives you an idea of how you can break down a complicated 3D card model into a series of simple tasks. A very simple (one, two, three) plate layout example!
Pilot3D Is Easy To Use!
Using just basic measurements, you define the support or seam line curves for the 3D shape with our simple curve defining, shaping, and smoothing commands. You can also import curves from other CAD programs. After that, all it takes is one command to fit a surface between any two curves and one more command to unwrap the 3D surface shape into an accurate 2D pattern. Then, you are ready to plot the full-size template or send the pattern to a CNC-ready geometry file.

For more details, please read this tutorial on creating a parabolic dome-shaped awning.
See also the St. Anthony's Cathedral Dome 2D Pattern Example.
Here are two more examples of surface creation and layout. Both start from digitized data. (See also the section on Reverse Engineering.) The first creates a surface with a cutout and the second creates and lays out a surface using only the boundary edge point data.
For additional information see our page on Surface Development and Layout.